Showing posts with label My Rooms. Show all posts

The Boys' Lake Cottage Bedroom

We recently visited my dad, who lives on a lake, and I did a few things to the boys' bedroom there.  Christian, our 5 year old (today's his birthday!!!) and Justin, our 2 "and-a-half" year old sleep in the room that used to be my dad's  and my Uncle Teddy's when they were boys.


Our family's had the cottage since the 50s and our boys love visiting now...


Whenever I visit my dad, I get a few things done here and there. Lots of it is fast and unplanned which means most of it is antique shops & retail..  This time, I did a little in the boys' bedroom.  Here's the view from the door...


I switched out some of the "girlier" fabrics and colors  (The aqua and corals I'd put in 10 years ago just weren't quite making it boyish enough ;) and added a few things from around the house & a few new ones.  I pulled in the old Ikea chair we'd had and am eying another chair to swap it our with but will have to wait on that one.  It's a nice spot to read with the boys.  I DEFINITELY need to add some blackout matchstick shades (they wake up waaaaaay to early with the sun & the time change) and plan on adding a wall of old family photos across from the bed so the boys will see their great-grandparents and the rest of the family when this lakehouse was in its heyday.  (It used to be packed every weekend with family but we live so far away it's not the same.)  We still all get together there, just not often enough. 

One of my favorite additions to the room is the set of basket fish we hung from the ceiling:

{found at the PB kids store}

I "borrowed" this vintage ship model of my dad's from another room in the house:

{A secret: The curtains I hung are too short for the windows but are mostly hidden behind furniture.  When the shades get added, I'll hand the rods a bit higher and add more fabric to the panels - probably in a contrasting fabric.  But for now = shhhhhhhh }

Christian sleeps on the left and Justin is on the right with the bed rails to keep him from falling out.  I love tucking them in at night and climbing into bed with one of  them.  Justin kicked me out this trip saying I should "snuggle with Trin Trin" instead.  (I guess I'm a bed hog.)  We watched fireworks  from the window the other night and I fell asleep.  It made me really happy.


I know it would have been a prettier pic without Justin's bed rails but that would have taken too long ;) ;)

I love the size of this room.  The ceilings give the illusion of even more space and there's not much "stuff" at all in here because we just bring our clothes when we come.   At home, the boys' room is so tiny that just 1 t-shirt on the floor makes it feel like a mess.  (Add in unmade beds and toys and books and the room looks trashed daily.)  They love playing with toys in here and even when they're not all picked up, the room still feels good.  I WISH this room was in our house at home.


Here are the boys "hanging out."  (Actually, me stealing them away form a game of hide-and-seek to make them sit o the bed so I could get a picture of them in their new room.  Ah vell.)

{"Are you done yet Mom?!!"}

In a couple of years, Luke  will join them in the big boys' room...  probably with a sleeping bag. 

xoxo, Lauren

AND HAPPY BIRTHDAY TO MY BIG 5 YEAR OLD!!!!!

ps- As I mentioned, I've been LOVING instagram on my phone and have been sharing little peeks of projects and tidbits on there.  I showed some pics of this room on there last week & looove playing with the photo editing to make the pics look cool.  (I'm really bad at it right now, I'll be honest, but I have hope.)  I'm not sure how to link over to it but my name on there is LaurenLiess and as soon as I can figure out how, I'll be sure to share a link on the blog so you can find me.  I've been having so much fun seeing everyone's phone photos and it's a little like twitter but waaaaaay better.

If you'd like help creating a home you absolutely love, contact me about our design services.

Before & After: Client's Dining Room

Last year, we began working with our clients who were undergoing a major renovation to their home.  The renovation was a thoughtful reworking of the existing space with the only addition to the house's footprint being the new screened-in porch.  The entire floorplan of the first floor was reworked and my clients created a massive open kitchen with an attached dining room and entry out of what once was the kitchen, dining room, living room and entry.  The wife likes bold fresh colors & has slightly modern taste while the husband is pretty traditional so we were really after a blending of the two.

We did the full house but I thought I'd start out by sharing the dining room with you.  Here's a photo of the dining room "before" which was at the back of the house:


And here's the dining room now:


Like me, my client loves botanicals & we couldn't resist these two massive ones by Natural Curiosities.  I flanked them with large bright green lamps to balance out their size.  The trestle table is paired with lighter carved chairs and I love the detail on the seat backs.   We found the neutral Greek key rug at Stark.  On the table, I used modern garden cloches on the table filled with ferns and orchids.  

We had the existing sideboard laquered white and my client had the GENIUS idea of adding a wooden board painted with chalkboard paint to the top of it:


It looks like slate but was super-inexpensive.  (I know, I know, chalkboard is EVERYWHERE... but I still love it in enexpected places!!)  We had planned to use honed granite or concrete & I'm so happy she did this instead!!!  It's so convenient now to label food & drinks set out on the bar.


For curtains, we used an overscale blue paisley by Schumacher and throughout the house we used a combination of bright blues & greens.  This project was particularly special for us to work on for a number of reasons and the "big reveal" had me teary... I want to thank my clients so much for letting us into your home &  your lives. 

I'm off for the day- am having contractions and am heading in to doc to check it out & am doubting this is "it" but they make you come in anyway so we'll see.  I'll keep you posted!!
UPDATE:  I'm home from doc and all is good & contractions will be coming & going but they aren't painful enough yet to be very productive!  Will keep you posted & hopefully I still have a couple mroe weeks to go :)


xoxo, Lauren

If you'd like help creating a home you absolutely love, contact me about our design services.

Sneakity Peek: Client Apartment

We recently finished up with our clients' gorgeous condo & I have a couple of pics to share.   My client has amazing taste and has amassed lots of collections of beautiful objects over the years.  She was ready for a fresh start design-wise & has a very defined style.  We wanted light & textural and we used a soft pallette of whites, creams, grays, aquas & taupes.  

This (below) is the view down one of the hallways & we went with a horizontally striped rug, which visually widens the hallway:


The apartment has the most beautiful light and the views are incredible.  I'll save the rest of it for when we have it professionally shot but before I go, I do want to share a few of Maureen's collections with you:


{old pulleys}


{I can't remember what this thing is but it is soooo gorgeous!!!  She found it at a thrift store, like many of her treasures}


{Her collection of vintage trophies is incredible.  I love them just piled together like this.}


{One of my favorite collections she has is her collection of glass & crystal bottle stops that she keeps at the drink station...  so beautiful.}

...Anyway, I'll be sure to share the rest of the apartment when I can!!  Thank you so much to my clients for letting us be a part of your redesign!!

xoxo, Lauren

If you'd like help creating a home you absolutely love, contact me about our design services.

Client's Living Room Before & After

A couple of years ago around Christmastime, I was contacted by a husband looking to give his wife a design consultation for Christmas.  He bought her a gift certificate & surprised her with it.  We met a month or two later & had a two hour consultation in their home.   I've always thought this was one of the sweetest things ever & thought about the clients from time to time.  She & I had sort stayed in "cyber" touch, and I was thrilled when they contacted me this Fall to redo the living room in their new home.   I would describe their style as very cozy, warm & a bit English.  (Which makes sense as the husband actually is English!)They started with a white box: popcorn ceilings and wall to wall white carpet. They were SO ready to get the house feeling like them and were thrilled to ditch their existing pieces for new ones that reflected their taste.

Here's the room before:

(That's Bailey on the floor :)

And here it is now:


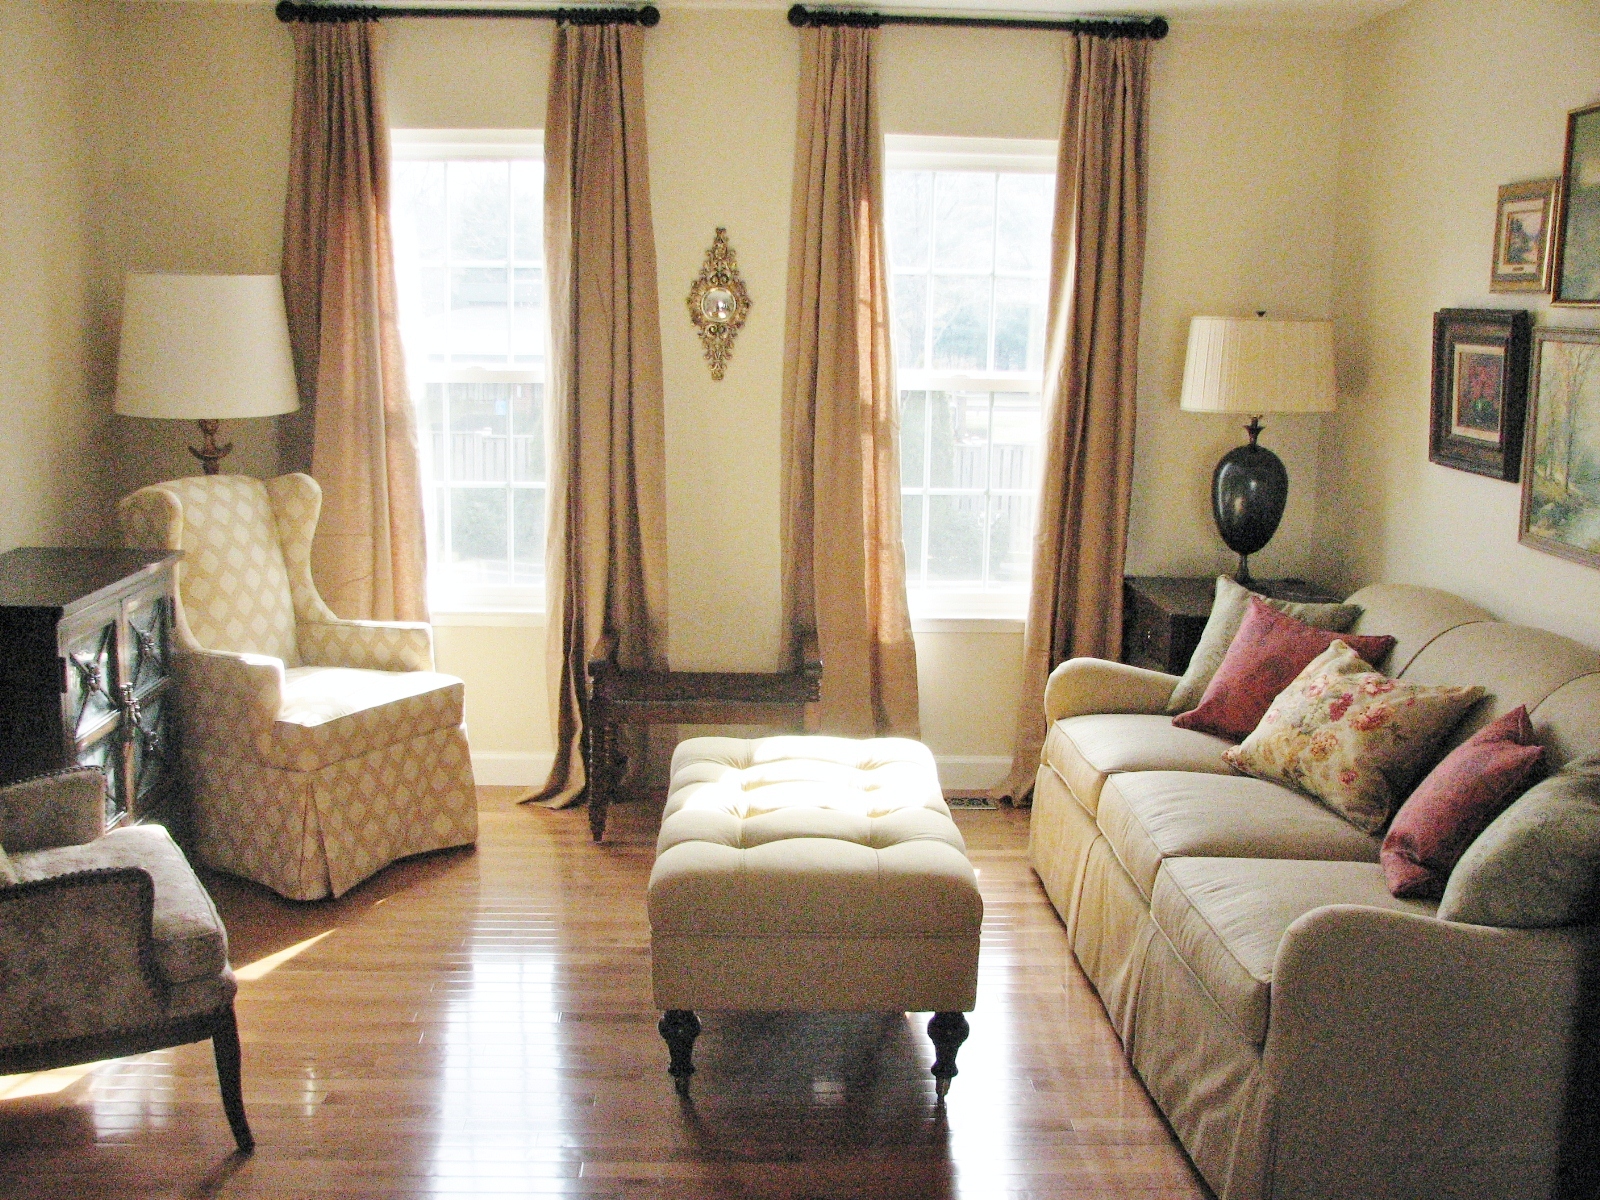
A natural woven rug & shades are on their way but I think the change is already incredible.  CarrMichael Construction ditched the popcorn ceilings and replaced the carpet with hardwood.  The walls were painted  in Benjamin Moore's "gentle cream" to warm up the room.  We kept their existing Victorian wing chair (which is SO similar to my Madhatter chair!!) in its original fabric and added a super-comfortable English arm sofa, storage ottoman for toys & puzzles for their little cutie pie, and skirted wing chair.  My client found everything for the walls at flea markets, antique shops & thrift stores.  (Go Emily!! :)

Here's the other side of the room where there was an awkward opening to the stairs that prevented them from having a balanced seating area and the cozy feeling they were after:


And here it is now, all closed up:


I love the little rush seat bench between the windows:


Here's a close-up of Emily's 'found' artwork above the sofa:


{Sofa pillow fabric: Ralph Lauren floral, Michael Smith's Indian Flower & a discontinued olive green paisley}

I think my favorite little spot is this skirted wing chair with the "goddess" floor lamp:


And finally, here's one more shot of the whole room:


Anyway, I'm off for the day but hope you enjoyed!!  We have another one tomorrrow so I'll be sure to post pics when I can.

xoxo, Lauren

If you'd like help creating a home you absolutely love, contact me about our design services.

Also, I just wanted to add, that due to time contraints & our project schedule, we are only able to take on full-service projects like this one (vs. design consultations like the one I mentioned at the beginning of this post).  I'm looking into the possibility of adding staff & making design consultations available again in the future, but for now, it's full projects only.  I will be sure to let you know if / when this changes!! :) 

The Back Office- Before & After

 As anyone with a home-based business knows, office space starts leaking into other areas of the house, and as your business grows & you bring in new people, you need more room.  A few months ago, we moved our guest bedroom from one bedroom to another room- an unfinished storage-type room that we had finished.  The "empty" guest room became our back office.  Here's a picture of it "before" when we pretty much just thew everything in it:

{scaaaaaary, I know}

A couple of weeks after doing that, we organized it and started working at our temporary sawhorse & scrap plywood desks.  We ordered furniture & and then we waited for everything to arrive.  We've been working in it as it gradually became an actual office.  It's finally all in & it feels so good to have this new extra space!!! 


We lined the walls in shelving (from West Elm) and stacked all of our fabric samples, magazines, client binders, inspiration binders and catalogues on the shelves.  I love having a spot for everything!!!  (Before it used to be spread through mulitple rooms but now it's all pretty much together.) 

It's sort of a long bowling-alleyish room which actually works really well for our purposes.  I put two massive hammered metal desks side by side to take up almost the whole right wall.  I use the one by the window (and heat vent) and my assistant, Meghan uses the one closer to the camera.  (Meghan is perpetually HOT and I like to be toasty so this works out best for us :)

I love having both a light space & a darker space to work in.  The office feels much moodier than the main workroom with huge table we use for spreading out projects:


It's so bright in here that it's hard to see the computer screen in the afternoons but it's perfect for working on fabrics & finishes and drawing & spreading out. 

 ...Back in the office, I love this shot that Helen took of the mimosas in my old lab beakers:


{Thanks for the flowers Holly!!!}

I was able to fit a teensy corner desk in the corner of the room for an additional workstation for bookkeeping & for our new intern, Alexa.  Christian has pretty much claimed it though:

{I snapped this pic of Christian in his NASA suit, "working."}

Our inspiration wall is finally up above our desks & it makes me so happy!!!


We layered it with photos that inspire us (some that have been saved for years with the hopes of one day having this wall) fabrics we love & that fit our mood, and mementos.  I piled some of my favorite design books in front of the wall for easy access, and because these desks are so incredibly deep (I think almost 3 feet?!!) we now actually have room for them to be nearby.


(You can spy Baby Liess's pic in there towards the bottom in front of my workstation! ;)

Anyway, because we have a place for almost everything, it's been really easy to keep it organized & that's so freeing.  (It's like those dreams you have of finding extra rooms in your house!!)

Also, I thought the comments were really interesting in the last post (from Friday) about sharing things on blogs, magazines, etc.  There seems to definitely be very differing opinions and I see both for sure but will probably continue with "sneakity peeks" of rooms vs showing the whole spaces until after I've given them a chance to be published.   (My office today is different because it's on my own home, of which I think I've shown pretty much every inch of on here :)  Would love to know your thoughts!


xoxo, Lauren

If you'd like help creating a home you absolutely love, contact me about our design services.

*Photos by Helen Norman

Bungalow Dining Room: Before & After

A client of mine purchased an adorable bungalow in a great neighborhood around here & I have been so excited about her project.  We're just finishing up the main level.  She's young & single and has a really great style: relaxed & fresh yet cozy with a tiny vintage-rustic edge.  After talking with her about what she was looking for & pouring over inspiration images, we decided on a mix of woods & aged finished with fresh, happy turquoisey-blues.

{The gorgeous paisley is by Raoul Textiles available through John Rosselli}

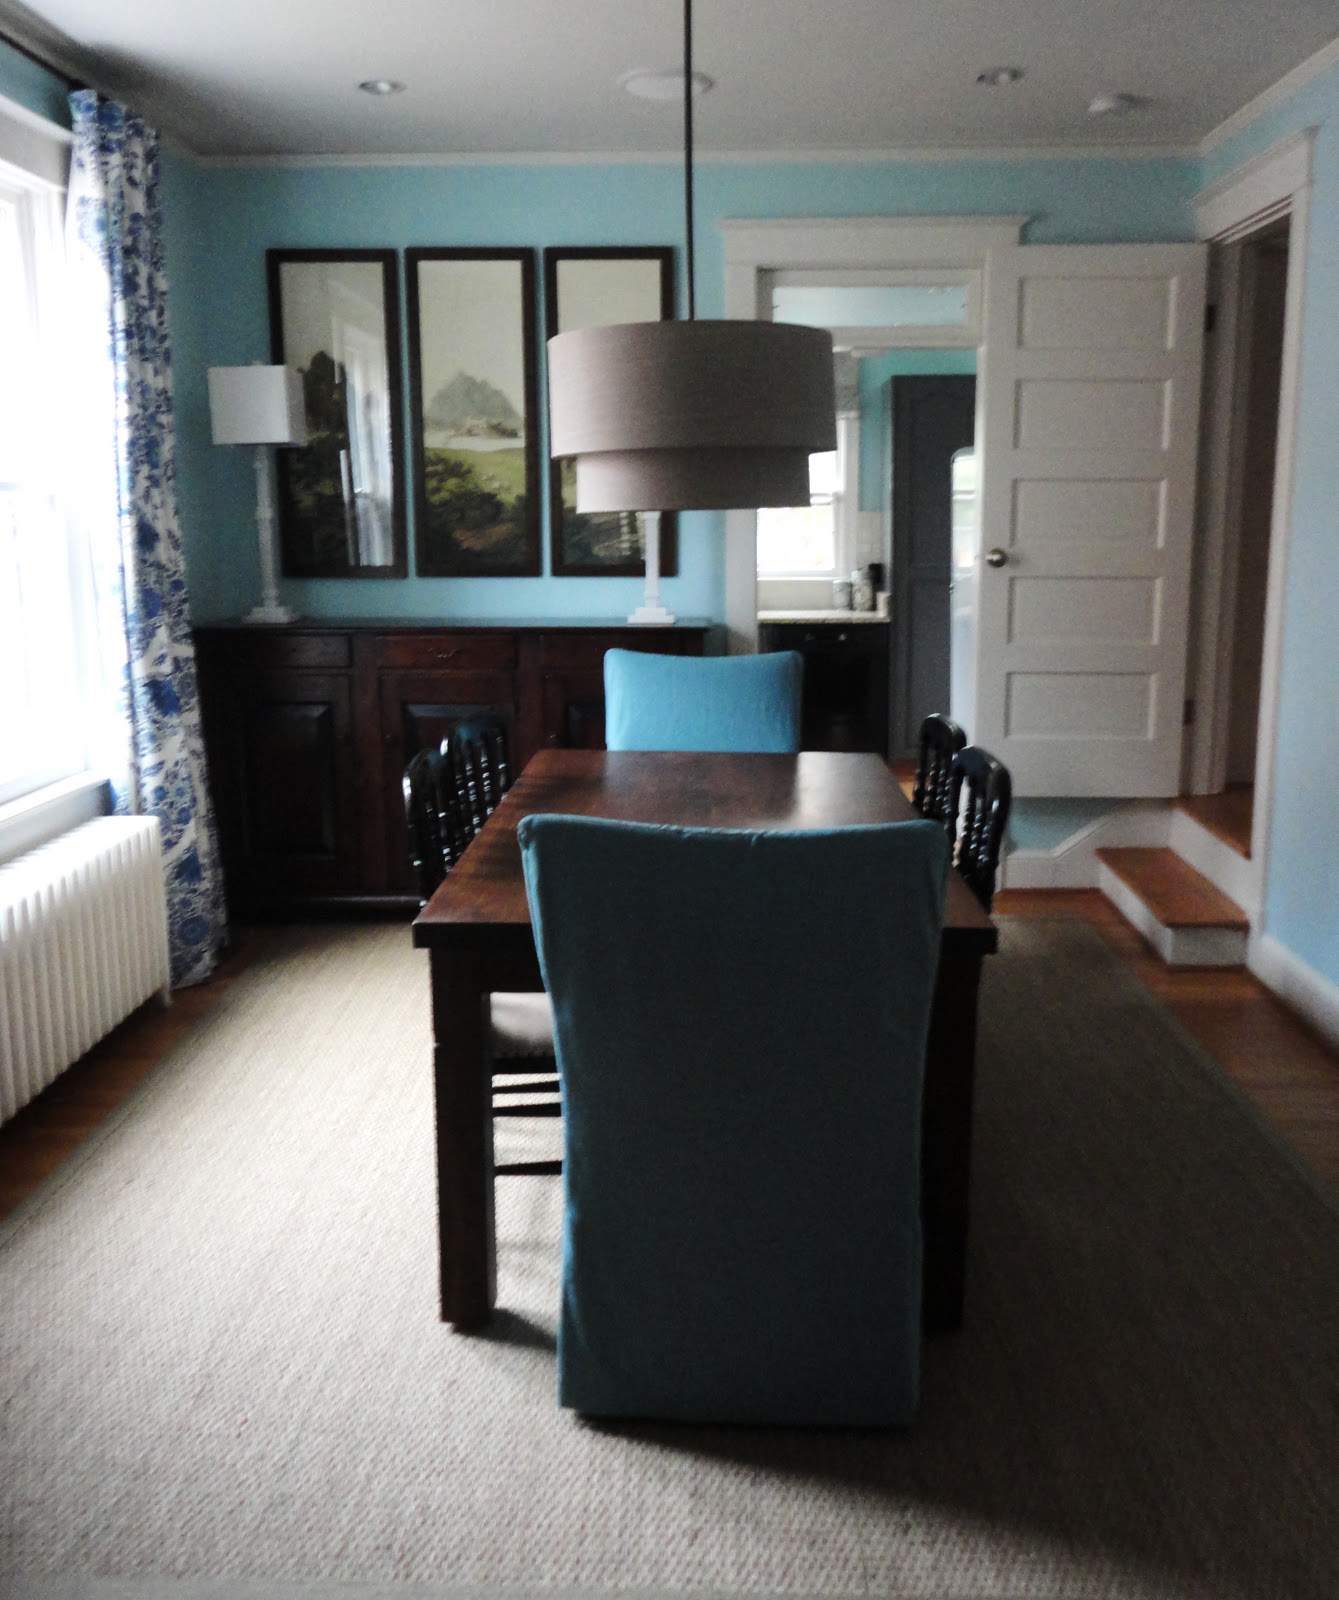
We installed the dining room & final rouches in the other rooms earlier this week so I wanted to share a couple quick {unstyled} shots of the dining room.  My camera battery died on installation day (boo hoo!!!) but I will definitely be back to share more & pics of the other spaces.  My client entertains frequently & I can't wait for her have some guests over to enjoy the finished dining room!  Here it is a few days after she moved in.  (You can spy moving boxes)--


...And here it is now:


The artwork is a set of 3 oversized prints (out of 16 total) made out of an antique children's game where the kids could mix and match the landscapes to create different stories.  It's hard to see in this photo but the landscapes line up and we chose a tree, a mountain and a crumbling old building flanked by a super tall pair of alabaster lamps.  The curtains (which are sadly so hard to see in this pic!!) are in a Raoul Textiles linen paisley and I want them. 


The host chairs are slipcovered in a  robin's egg linen and I love their lines.  I'll be sure to share close-ups eventually, but the vintage-styled spindled side chairs are in black with oatmeal linen seats.  The reclaimed wood parsons table is custom by one of our favorite companies -The Lorimer Workshop - and its finish is incredible.  (If you're looking to for the perfect table, I can't recommend them enough.  The owner, David Ellison, is so helpful & knowledgable & you will end up with an amazing piece. Check it out here.)  The sideboard in the background is a painstaking reproduction & it has the most incredible rat-tail hinges.   (by Sarried Ltd.)

Everything is simple & functional and I know my client will serve up some amazing gourmet meals in here.  (She loves to cook & could write a blog on entertaining/ creative meals & drinks:)  I can't thank my client enough for such a fun & rewarding project.   (I don't want it to be over!! ;)

I'm off for the day but have a great weekend & good luck if you're braving the stores for Christmas shopping!!  I am going to try to get a fire going this weekend!

xoxo, Lauren

If you'd like help creating a home you absolutely love, contact me about our design services.

Before & After: Happy Kids' Art Wall

This past Summer, a client of ours moved into a large newly-built home.  There were so many areas to address (we're still going) but one of the most important areas in making a house feel like a home is the kitchen.  Our client had collected a ton of her children's artwork and so we thought it would be great to make a focal point in the kitchen dining area out of it.  My client's style is bright & happy & fun so the colors were perfect.  We started out with this:


And we ended up with this:


We had so much fun creating this collage!!!   In the evening, the sconces create the prefect glow around the artwork.  We still have to do a bit of styling to do (a zebra rug was in our original plan & we need to put something pretty on the table- I'll be sure to get a final professional pic!) but I am loving the vibe!!!   The curtains are this great red medallion pattern that's happy, fresh & graphic.

This is something I've been meaning to do forevah for my boys & so my client's project gave me the get-up-and-go I needed.  It was super-easy but had such a big, personal impact on the space.  (I love easy high-impact projects.)  We picked up frames this weekend for house & I'm now scouring my house for the boys' artwork.  (I'm not as organized as my client with my kids's stuff! ;)  I'll be sure to share pics when we're done too!

My clients kids are so proud to have their artwork displayed in such a prominent spot in the house.  (They now even have plans for more walls!! :)  If you've got a spot for it, I think it's one of the coolest things you can do to make your kids feel like they've been included in "decorating" your home. 

I'm off for the day & hope you have a great one!! :)


INFO:
*The paint color remained the same... it's the difference btwn cloudy & sunny & cameras.
*Curtain fabric is by John Robshaw
*Pendant & Sconces by Visual Comfort}

xoxo, Lauren
If you'd like help creating a home you absolutely love, contact me about our design services.

Progress in the Guest Room

A couple of months ago we took our scary storage/ workout room....


...And turned it into a guest room.  We started by tearing out the drop ceilings & then having the walls & ceiling re-drywalled.  A closet door  was also added to hide the massive storage closet/ understairs storage.  We took our old guest room and turned it into another office for me & my assistant, Meghan.  (We are still waiting for our furniture to arrive in the office but I'll post pics when we're finished!)

The guest room is pretty much a hodgepodge of things we already had, with the only new item being the linen curtains I had made out of my new Thistle fabric.  I used the vintage wooden dresser I found a while back & truth-be-told, it's stuffed with off-season clothes.  My wooden lady (who is super-heavy) makes me happy:


We're still missing one of the most important elements in the room- the headboard!!- so I have to warn you that the pics really don't look that great, but I'm excited about the progress we've made & wanted to share.  (The pics are also really grainy- sorry!!!)  It's a very tiny room so just room for a bed with a small trunk at the end.  (Which I couldn't even fit into a picture)  I used white/cream bedding we already had & have been having fun layering the bed with different quilts to suit my different moods.  Right now I wanted sort of a Fallish-Bohemian feeling so I used a couple of old vintage quilts.  Here's a blurry pic I snapped of the half unmade bed this morning:


{The quilts are vintage and the 2 boudoir pillows are in a Peter Dunham linen}

I used my favorite pair of massive glass lamps on either side of the bed & was able to just fit in our pedestal table along with the dresser:

{The window isn't centered in the room so we had to go with two totally different sizes of end tables...  Since we were using pieces we already had, the pedestal table is a bit shorter than I'd like so I raised the lamp up with some books to make it more even with its mate.}

I have a collection of old mushroom prints on one wall and wooden printers' trays that the boys & I are working on filling with natural objects on the other, so I'll be sure to share overall pics when we're "finished."  I'm planning on doing a headbaord upholstered in warn oatmeal linen that will stop right at the window sill.  I'm debating on on its shape because I am still to excited over my curtains to cover them up too much with a straight headboard so it will either be rounded or I'll cut out the corners.

Here's a close-up of the curtains in Thistle in Sepia & I'm pretty excited to see them in there:

{I chose them because I could mix them with just about any colors I wanted when my moods change}

Anyway, I'll share more when there's more to see.  I hope you liked it & that you're having a great week!!  I also took a few more photos the other day of one of our most recent installs & will be sure to share.  My client's bedroom turned out beautifully & is really different from this one, so I'll try to post soon.


xoxo, Lauren

If you're interested in purchasing any of my fabrics, you can visit my online store here.

If you'd like help creating a home you absolutely love, contact me about our design services.
Copyright © home design ideas. All Rights Reserved.